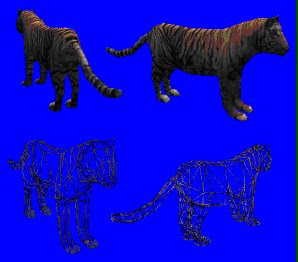
Saturday, May 26, 2007

Belly Punching Contest

PREVIOUS PRACTICE NO. Previous 10 Practice 9

PREVIOUS
NO. 10

Skeletal Animation:
A 3D model is composed of hundreds or thousands of polygons of various shapes and sizes joined together form the shape desired. The number of sites has increased steadily so that now to form the arm of a particular model is used by thousands of polygons ... thousands of polygons that have to change their size and shape with every slight movement of the model. Calculate
each deformation of these thousands of polygons and their new coordinates in the scene, besides the application of light effects on them, textured, filtered ... The work required by the graphics system is tremendous. To eliminate that huge cargo base technology "skeleton 3d. The "skeletal animation is based on creating an architecture model or skeleton and then cover it texture (or skin). With this technique, each member of the gorilla sample covering polygon build a "bone" (bone) of the skeleton. The benefits come when that member has to move from the body. Each bone will have a limited movement with respect to the bone that joins with exactly the same way as it has the real animal. Each moving part of the model is formed through a bone that has its own coat of meat (polygons) and their own skin (textures) and the mobility that the programmer I want to give. Thus, the gorilla's example might have a bone that allows you to move the arm about the shoulder, forearm, the rest of the arm, hand on the forearm, fingers on the hand ... The movement is much more realistic and, above all, it requires far fewer system resources by not having to calculate the deformation of the polygons that until now were used to represent the joints.
The only problem of creating 3D models from a skeleton found at the junction of the various bones. Between a bone and another is a space that, according to the comparison with the actual body of vertebrates, called a joint. This joint contracts, it stretches and deforms in different ways depending on the movement to make the two bones that connects eg

The rift that develops between two bones is something that can not be displayed in the image final. To hide it using the technique "Skinning", as its name suggests, is responsible for skin EFG these imperfections.

Through this flexible skin that connects each of the vertices of a corresponding bone in the other, giving continuity to the object and is very close to all-natural motion can be seen in any living being. A problem that generates this "skin" lies in the texture that covers the skin.
The problem is how to connect the various bones of the final look so realistic. That takes the Vertex Skinning. This technique is based on the application as realistic as possible the calculation of mathematical functions that calculate the position of each vertex of an object in the scene. Explained in a simple, takes care of filling the most realistic way possible gaps between the various "bones" of which we have spoken. The union between those bones is more real the more matrices are used. These matrices are mathematical calculations designed to connect together each vertex of the object. The more times you recalculate the union (more arrays there), more realistic the final object.

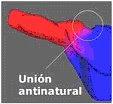
arm model (red) joins the torso (in blue). Each color represents one of the matrices and, as we see, the union between them is unnatural. ATi Radeon cards as supporting up to four arrays for hardware, so that examples like this, adding a third array would solve the problem.

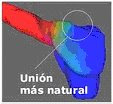
matrices include red and blue, has introduced a third matrix represented in green. This matrix is \u200b\u200binserted between the other two acting as a kind of flexible cushion that makes the union of two more natural. If the result is not the sought could introduce a fourth matrix and further improve the outcome. Another advantage of having more matrices in representing a model, is that you can define the behavior of the texture (skin) that covers each array. If it is to represent an animal's skin, the texture that covers the central matrix is \u200b\u200bstretched while covering the other two matrices remain the same. Similarly, each matrix may be affected differently by light, darkening or lightening the texture that covers it.
The great advantage of the ATI Radeon is calculated up to four of these matrices in hardware. Software to calculate these matrices would be impossible as the main processor would completely collapsed before this influx of calculation operations in real time.
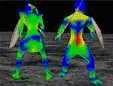
The following chart we can see a real example in a game, Dungeon Siege from Microsoft, which you can see the four matrices in different colors.

Each color represents a matrix, however, more effective implementation of the different arrays, shown is more effective in automatic transitions. The familiar "morphs."
Formats:
. Fbx
FBX format developed by Kaydara to exchange information.
FBX is a binary format that supports all kinds of 3D data, 2D, video and audio, greatly facilitating communication between different applications (like Cinema4D, Lightwave, 3D Studio).
.
fpx format that supports multiple resolutions of an image. With or without compression and 8 to 24 bits of color depth Developed by Kodak in conjunction with Hewlett Packard
. X
files. X are composed of templates, which can be defined by the user. A template is a "definition of how the user wants to store the information."
To encourage a file. X need to specify a series of animations with reference to the corresponding frame matrices. Below is an example of our square textured and animated.
An example of these formats "optimized" for games are those used by Id Software for Quake. You may write a tutorial on this most adellante format, but for now let's start with a more simple format. X which is the default using DirectX.

there a tool that comes with the DirectX8 SDK to transform files formatted 3dStudio. X in C: \\ MSSDK \\ bin \\ DXUtils \\ XFiles \\ conv3ds.exe

these files. X will contain information about our 3D models (characters, ships, etc ...) and even our 3D world (tracks, cities, maps, etc ...)

key points when working with these files are:

- In what ways are stored objects.

- how they are interrelated.
MODEL:

Saturday, May 19, 2007

How Do You Simpleollie On A Tech Deck


Previous Practice No.9
1 .- Find out about the usual methods

animation Keyframes (Tables Key):
refers to pictures or drawings which defines an essential part of start and end between transition points. These are called "frames" because their long life are part of a film. A sequence of keyframes defines the movement that the viewer can see, sometimes the position of the keyframes in a film, video or animation defines the time of the movement. For the duration of only 2 or 3 keyframes in a second does not produce an illusion of movement, the permanence of the frames are set with more pictures or images, called "inbetweens."

Forward Kinematics (Kinematics):

is a method of 3D computer graphics for animation of models. The essential concept of this concept is that the position of particular parts of a model in a specific time are calculated from the position of the object orientation d, along with information on the union of a joint model.

Inverse Kinematics (Kinematics Reverse):

is a process used in the animation of 3D computer graphics, which requires calculating the articulation of a series of tips or Conjuntura, as at the end of the limb up in a particular location.

Motion Capture (motion capture):

is a digital recording technique of movements for entertainment or entertainment, sports and medical applications. It uses multiple capture systems from the optical, mechanical, magnetic systems, either through the use of sensors or other devices. Movements not only records the appearance, this method has emerged as military research.

2 .- Discuss the advantages and disadvantages of each method and at least two examples of situations that everyone is best applied.

Keyframes (Tables Key):

Advantages: Easy to handle

Useful for quick videos.
only takes basic shapes.

Disadvantages: Inefficient
for good animation.
For a big job you need several basic shapes.

Applications:

Films Commercial Videos

Presentations

Forward Kinematics (Kinematics):
Advantages:
certain behaviors.
certain positions.
every move is planned.

Disadvantages:
not define physical laws like gravity and collisions.

Applications: Robotics


Computer Games Animation.

Inverse Kinematics (Inverse Kinematics):
Advantages:
Responsible for joint requirements.

Disadvantages: Limits

anthropomorphic joint limits

Applications: Robotics

Computer Animation.

Motion Capture (motion capture):
Advantages: Faster
sometimes gives better results in real time.
The workload does not vary with the complexity or size quality or the same degree when using traditional techniques.
complex movement and realistic physical interactions such as a secondary animation, weight and exchange of forces can be more easily created with a precise check.
technology gives an actor play multiple roles in one film.
Disadvantages:
need specific hardware and special programs required to obtain and process data.
The cost of software and equipment, required personnel may not be feasible for small productions.
capture system should have specific requirements to be operated on them.
When problems occur they can be easily Retracing the scene is better than trying to manipulate the data. Only few systems accommodate real-time view of data to decide whether to take action on the matter or have to redo. Expanded
motion to quadruple characters can be difficult.
technology can become obsolete in a few years as well as software and development techniques.
The results are limited to the existence of a high quality capture depending on the volume and extra edition of the data.
movement can not follow the laws of physics generally can not be represented.
traditional animation techniques such as stress or the anticipation and monitoring movements side or manipulation, are narrow in the animation and generally do not apply.
If the computer model has different proportions from the capture of the object, this can occur.
real quality of life can not move the computer model as expected.

Applications:
In games where motion capture, for example: football, basketball and martial arts fighting, action sports in general.
To capture CG effects, in some cases replace cell animation and fully computer spawns as Golum, The Mummy and King Kong
Virtual Reality for real-time interaction. Just as visualization. Character Generation
real time.

3 .- Find out what method of animation using models of Quake and Unreal Tournament. Search using OpenGL code that helps illustrate a model of these games and run it.


Quake models used to predict movement therefore use the method of Forward Kinematics.

Unreal Tournament models have bases

Monday, May 14, 2007

Wedding Welcome Board Ideas

Pseudocode Lighting by Raster

int V1x, v1y, V2X, v2y, v3x, v3y, V4x, v4y; / / vertices

void lights () {float *

Ax * Ay

A'x float *, * A'y;

float * Bx, * By;
B'x
float *, * B'y;

float * Cx * Cy;

float * C'x , * C'y;
int ret;

if (ordena1 == 1) {/ / function vertex ordering devulve more orderly
bresenham1
B'x = (* Ax, * Ay, * By, Bx * ) / / use the Bresenham algorithm
B'y = bresenham2 (* Ax, * Ay, * By, * Bx)
color (r, g, b, B'x)
color (r, g, b , B'y)
bresenham1 C'x = (* Ax, * Ay, * Cy * Cx)
C'y = bresenham2 (* Ax, * Ay, * Cy * Cx)
color (r, g , b, C'x)
color (r, g, b, C'y)


}


if(ordena2==1){
B'x=bresenham1(*Ax,*Ay,*By,*Bx)
B'y=bresenham2(*Ax,*Ay,*By,*Bx)
color(r,g,b,B'x);
color(r,g,b,B'y);
C'x=bresenham1(*Ax,*Ay,*Cy,*Cx)
C'y=bresenham2(*Ax,*Ay,*Cy,*Cx)
color(r,g,b,C'x);
color(r,g,b,C'y);
}
if(ordena3==1){
B'x=bresenham1(*Ax,*Ay,*By,*Bx)
B'y=bresenham2(*Ax,*Ay,*By,*Bx)
color(r,g,b,B'x);
color(r,g,b,B'y);
C'x=bresenham1(*Ax,*Ay,*Cy,*Cx)
C'y=bresenham2(*Ax,*Ay,*Cy,*Cx)
color(r,g,b,C'x);
color(r,g,b,C'y);
}
if(ordena4==1){
B'x=bresenham1(*Ax,*Ay,*By,*Bx)
B'y=bresenham2(*Ax,*Ay,*By,*Bx)
color(r,g,b,B'x);
color(r,g,b,B'y);
C'x=bresenham1(*Ax,*Ay,*Cy,*Cx)
C'y=bresenham2(*Ax,*Ay,*Cy,*Cx)
color(r,g,b,C'x);
color(r,g,b,C'y);
}
while(By!=Cy){

if( B'y <=c'y&& c'y==cy){
A'y=cy
A'x=cx}


if( c'y <=B'y&& B'y==By){
Ay=By
Ax=Bx}


if(c'y=cy){
cy=V3Y
cx=v3X
}

if( B'y==By){
By=V3Y
Bx=v3X
}

}
B'x=bresenham1(*Ax,*Ay,*By,*Bx)
B'y=bresenham2(*Ax,*Ay,*By,*Bx)
color(r,g,b,B'x);
color(r,g,b,B'y);
C'x=bresenham1(*Ax,*Ay,*Cy,*Cx)
C'y=bresenham2(*Ax,*Ay,*Cy,*Cx)
color(r,g,b,C'x);
color(r,g,b,C'y);


}
}


int ordena1(){
if(v2y <=v1y> =v3y &&amp; v1y>=v4y){
Ay=A'y=v1y;
Ax=A'x=v1x;
if(v3y <=v2y> =v4y({
By=B'y=v2y;
Bx=B'x=v2x;

if(v3y <=v4y{
cy=c'y=v4y;
cx=c'x=v4x;
}else{

cy=c'y=v3y;
cx=c'x=v3x;
}
}
if(v2y <=v3y> =v4y){
By=B'y=v3y;
Bx=B'x=v3x;
if(v2y <=v4y{
cy=c'y=v4y;
cx=c'x=v4x;
}else{

cy=c'y=v2y;
cx=c'x=v2x;
}
}

}

if(v3y <=v4y> =v2y){
By=B'y=v4y;
Bx = B'x = V4x;
if (c = c'y <=v2y{
v3y = v2y;
c'x = cx = V2X;


} else {c = c'y = v3y;
cx = c ' x = v3x;

}}
verif = 1;}


else
verif = 0;

}}

Tuesday, May 8, 2007

Tanning To Eliminate Severe Acne Scars


1 .- Find out how to create and define a light source in OpenGL creation of light:
CREATION OF LIGHT SOURCES
The properties of a light source are the color, position and direction. The command used to specify all the properties of a light is glLight * (), has three arguments to identify the light that is being used, property and the desired value for esapropiedad.
After defining the characteristics of the lights, turn it on with the command glEnable (). Also need to call this command with the parameter GL_LIGHTING, so be prepared to develop OpenGL lighting calculations.

How many lights can be set?:
We have eight light sources in the scene (there may be more dependent on the implementation of OpenGL. OpenGL needs to perform calculations to determine how much light each vertex receives from each source light. The increase in the number of lights affects slower execution.

Configuring the light source

glLight void {if} [v] (GLenum light, GLenum pname, TYPE param) Creates
light specified by light, which can be GL_LIGHT0, GL_LIGHT1,
... GL_LIGHT7. The light characteristics are defined by pname. The argument
param indicates the values \u200b\u200bthat the feature set pname, if you use the version of
vector (v) pname is a pointer to a set of values, or the actual value if the version without vector is what we are using (i f).
default values \u200b\u200bfor the parameter pname of glLLight * ().
Types of lights

In OpenGL there are three basic types of lights: Turn signals
local

Lights Spotlights
All types of lights to define an environmental component, a diffuse and specular RGBA components. Define
light sources (properties of each of the lights). GLvoid
glLightfv (GLenum light, GLenum pname, const GLfloat * params);
Light: Light to which reference is being made (GL_LIGHT0, GL_LIGHT1, GL_LIGHT2, etc.).
* params is an array of RGBA values, each value defines the percentage of intensity of each color is light. Directional lights

A directional light is located at infinity
Define the vector
directional diffuse float [3] = {1.0,0.0,0.0};
float direction [4] = {1.0,1.0,1.0,0.0};
glLightfv (GL_LIGHT0, GL_POSITION, direction};
glLightfv (GL_LIGHT0, GL_DIFFUSE, diffuse);
local lights
local lights are defined in the same way that the directional only the fourth element of the vector equals one.
float diffuse [3] = {1.0,0.0,0.0};
float position [4] = {1.0,1.0,1.0,1.0};
glLightfv (GL_LIGHT0, GL_POSITION, position};
glLightfv (GL_LIGHT0, GL_DIFFUSE, diffuse);
Light Bulbs
The focus is defined as: a local light, an address or a opening of the bulb.
float diffuse [3] = {1.0,0.0,0.0};
float position [4] = {1.0,1.0,1.0,1.0};
float direction [3] = {1.0,1.0,1.0};
glLightfv (GL_LIGHT0, GL_POSITION, position};
glLightfv (GL_LIGHT0, GL_DIFFUSE, diffuse )
glLightfv (GL_LIGHT0, GL_SPOT_DIRECTION, address) / / Address of focus
glLightf (GL_LIGHT0, GL_SPOT_CUTOFF, 20), / / \u200b\u200bcutting angle between 0 and 180


Light color OpenGL allows you to associate any light three color-related parameters:
GL_AMBIENT, GL_DIFFUSE, GL_SPECULAR. GL_AMBIENT parameter refers to the RGBA intensity of ambient light that a light source adds to the scene. The default is no ambient light. The GL_DIFFUSE parameter is the one most related to the concept that we normally "light color" refers to the RGBA intensity of light diffused light source adds to the scene. The default is (1.0, 1.0, 1.0, 1.0) for GL_LIGHT0 that produces a bright white light. The default value is GL_LIGHT1 ... GL_LIGHT7 (0.0, 0.0, 0.0, 0.0). GL_SPECULAR parameter affects the specular color of an object. An object like a glass mirror has a light that is the color of the light is shining on it, usually white. If we want to create a realistic effect, and GL_DIFFUSE GL_SPECULAR parameter must be set the same value. Enabling

and desabilitación
light for the light to take effect you must activate the lighting model calculation using the lights using the call: glEnable (GL_LIGHTING) and to disable glDisable (GL_LIGHTING)
and activate each of the individual lights that are
want to use with glEnable (GL_LIGHTn) and disable glDisable (GL_LIGHTn)

Light by defaul and features by defaul
is a basic ambient light which specify how to perform the lighting of the scene as to whether the lights affect two parts of an object model for calculating the relationship between the observer and the objects in the case of specular component. Properties to set
basic lighting model:
glLightModelfv (GL_LIGHT_MODEL_AMBIENT, environment), / / \u200b\u200benvironment values \u200b\u200blacomponente base.
GlLightModelf (GL_LIGHT_MODEL_TWO_SIDE, TRUE) / / afectana lights both sides of a material.
GlLightModelfv (GL_LIGHT_MODEL_LOCAL_VIEWER, TRUE); / / Put the method of calculating local observers speculate, if not all calculations are done as if the observer was located on the Z axis


2 .- Investigate the difference between light illumination I (ligth / ligthing)

desabilitación Enabling and lighting (how?)
To enable / disable all lighting within a scene is used:
glEnable (GL_LIGHTING)
glDisable (GL_LIGHTING)

For there to enable or disable lighting
With OpenGL you need to explicitly enable or disable lighting. If no color is enabled
now is mapped to the vertex but normal calculations, light sources, lighting model and material properties do not occur.

3 .- Research the definition of material properties to a surface
Ø The OpenGL lighting model makes an approximation of the color of a material according to the light striking it and the light that is able to reflect
Ø For example a perfectly red ball is the one object whose material is capable of absorbing all wavelengths except red and is able to reflect only that color
or materials have two properties on colors, which indicate how it affects each of the properties of a ray of light on it
Ambient
Ø Ø Ø Diffuse
also has three properties on the emission capacity and light reflection Specular

Ø Ø Ø shininess

Ambient Emission
Ø Ø marries Ambient property of a beam light and indicates how the material will behave according to the component Ambient light beam incident
Ø refers to the color material default
Ø Ø Diffuse
marries Diffuse ownership of a ray of light and indicates how the material will behave according to the Diffuse component of the incident light beam Ø
refers to the light reflected from diffusely
Ø These two properties determine the color of the material and usually have approximate values \u200b\u200bbut equal
Ø Ø Specular
marries Specular property of a light beam and indicates how the material will behave according to the Specular component incident light beam
speculate or property is usually defined white or gray, so that the reflections of the material are broken down from the base color of the incident light to the color defined in this property
shininess
Ø Ø Determine the concentration of the points will reflect the light
or may be a single point or all the object's surface

Ø Emission
l This property defines the ability to simulate a
light output L is not a light source
l define the colors of light emitted is used to simulate
l stars, lamps, or similar objects

surface characteristics (diffuse, specular, brightness, emissivity, etc.)

Ambient Light Ambient light is one that does not come from a direction which affects all parts of the object equally. Iambiente
Ia ka ka =
environmental reflection coefficient [0.1] dependent on each object. Environmental
the intensity at any point in space. Scattered light


• The source has a particular location and direction
• Once the object touches the surface, is reflected in all directions
The diffuse light is coming from a particular direction and is reflected in all directions.
affects those parts of the object on which light falls.
The diffuse light is reflected from the surface of an object so motionless.
IL:
source intensity q: Angle of Incidence [0 ° .. 90 °]
Kd: scattering coefficient for each object [0 .. 1]
N: Normal to the surface (Unit)
L: Vector Lighting (unit)

• Specular light is also directional, but the reflection occurs in a particular direction
• Produces bright spot on the surface that lights up ->
specular Specular light comes from a particular direction and is reflected in one direction.
produces intense glare.
Specular reflections are usually the same color as the source of light.
The intensity of the specular reflected light depends on:
The wavelength of incident light
The angle of incident light
Material characteristics
a perfect mirror in the direction from which we observe the reflection is the perfect reflection direction R.
Specular reflection depends on the observer's position.
Depending on the size (degree of polishing) the brightness is more or less concentrated around the point where R and V coincide. GLOSS

are based on the materials specular component produces a bleaching

material depends on the point of view produces specular

For shiny material, the light must contain a non-zero specular component:
Spec [] = {1.0f, 1.0f, 1.0f, 1.0f};
glLigth (GL_LIGHT0, GL_SPECULAR, Spec);
material that has a bearing on should also have a non-zero specular component:
GLfloat specular [] = {1.0f, 1.0f, 1.0f, 1.0f}; glEnable (GL_COLOR_MATERIAL) glColorMaterial (GL_FRONT, GL_AMBIENT_AND_DIFFUSE) glMaterialfv (GL_FRONT, GL_SPECULAR, specular);

The brightness of the material property determines the size of the surface to reflect the brightness
glMaterialf (GL_FRONT, GL_SPECULAR, mat_option)
glMateriali (GL_FRONT, GL_SHININESS, 128);

The value of this component varies between:
0 The surface is a 128 point
entire surface of the object reflects
SHADOWS
Absence of light produced usually by the superposition of an opaque body between a light source and another body
In OpenGL projections are only made on volumetric objects
Types of Shadows: Shadows

Volumetric shadows shadows

is the simplest technique and involves calculate a projection matrix onto the plane on which you want to draw the shadow
Once calculated this matrix, when multiplied by the matrix model, and draw the rest of the figures, they will be projected onto that plane

volumetric shadows
The prior art is simple, but only serves to draw those leftovers
If projected on planes it has a composition of figures in which a cast shadows on each other, with the prior art can not be represented
To avoid this using a special matrix that will calculate the influence of the position of an object on the other

FOG
Effect special blend used for a scene giving the impression that it is actually covered by a mass of fog
Overall color is to blur the scene, obscuring the most distant objects even to disappear, while closer objects appear more
light fog effect can be applied in two main ways:
Based on Based on tables
vertices
How
is defined on which side (s) of a polygon apply the materials? It has the function

glMaterial void {if} {v} (GLenum face, GLenum pname, TYPE * param);
Where:
glMaterial parameters {fv}
Face: Indicates the face on which to apply the à GL_FRONT
material is used on the front faces of the object
à GL_BACK Apply on the inner surfaces of the object
à GL_FRONT_AND_BACK applies on all faces of the Param
: Indicates the property to be set from the already explained 4 .- Invetige about texture mapping in OpenGL

bytmap Load-definition

load is opening the bitmap file directly and assigning it to a pointer and then paint it: bool
CTextura: CargarBMP (char * szNombreFichero)

{FILE * hFichero;
AUX_RGBImageRec * Image;
bool bResult = false;


if ( szNombreFichero) / / Check that the filename is correct
{
hFichero = fopen (szNombreFichero, "r"); / / Check if file exists (if we can open it)

if (hFichero) / / Is there a file ?

{fclose (hFichero) / / Close the handle
Create (szNombreFichero)

Image = auxDIBImageLoad (szNombreFichero) / / Load the BMP
m_nAncho = image-> sizeX;
m_nAlto = image-> SizeY;

glTexImage2D (GL_TEXTURE_2D, 0, 3 , m_nAncho, m_nAlto, 0, GL_RGB, GL_UNSIGNED_BYTE, Image-> data);

bResult = true;

}}
delete Image-> data;
delete Image;
return bResult;}


texture transformation and Ways of applying a texture (repeat, wrap, etc)

function is indicated by:
texture size is usually not the same as the projected polygon is pasted on, there will be cases where the size of the texture will be greater than the projected polygon and others that will be lower.

need to specify how to calculate the final color of the pixels on the projected polygon, from the texture image. In addition, we may be interested in the texture is repeated at certain intervals of time. All of this behavior is set through the function: void

glTexParameter {if} {v} (GLenum tipoTex, GLenum param, TYPE value);

where tipoTex can be GL_TEXTURE_1D or GL_TEXTURE_2D and param and value can take values \u200b\u200bfrom the table below: Parameter Value


GL_TEXTURE_WRAP_S GL_CLAMP, GL_REPEAT
GL_TEXTURE_WRAP_T GL_CLAMP, GL_REPEAT
GL_TEXTURE_MAG_FILTER GL_NEAREST, GL_LINEAR
GL_TEXTURE_MIN_FILTER GL_NEAREST, GL_LINEAR,
GL_NEAREST_MIPMAP_NEAREST,
GL_NEAREST_MIPMAP_LINEAR,
GL_LINEAR_MIPMAP_NEAREST,
GL_LINEAR_MIPMAP_LINEAR
GL_TEXTURE_BORDER_COLOR four values \u200b\u200bin the interval [0 ... 1]

An example of its use is as follows:
glTexParameterfv (GL_TEXTURE_2D, GL_TEXTURE_WRAP_S, GL_REPEAT)
glTexParameterfv (GL_TEXTURE_2D, GL_TEXTURE_WRAP_T, GL_REPEAT)

Texture Mapping

surface texture is initialized before indicating the type of surface including:
glTexParameterfv (GL_TEXTURE_2D, GL_TEXTURE_WRAP_S, GL_REPEAT)
glTexParameterfv (GL_TEXTURE_2D , GL_TEXTURE_WRAP_T, GL_REPEAT)
The first allows the textures are repeated horizontally, and the second vertical
.
With this change, we could map the texture coordinates
greater than 1, so the textures are repeated, thus:
glBindTexture (GL_TEXTURE_2D, texture_floor)
glBegin (GL_QUADS)
glTexCoord2d (0.0,0.0)
glVertex3f (-6.0,0.0, -6.0);
glTexCoord2d (0.0,6.0);
glVertex3f (-6.0,0.0,6.0)
glTexCoord2d (6.0,6.0);
glVertex3f (6.0,0.0,6.0);
glTexCoord2d (6.0,0.0);
glVertex3f (6.0,0.0, -6.0);
glEnd ();

Tips At Bonefish Grille

Previous Previous 8 8

Aide Program to create 2 cubes, two lights, texture and materials used

# include GL / glut.h

# include stdlib.h # include stdio.h math.h

# include # include "bitmap.h" int Width
;
int Height;
int bd, bi;
BITMAPINFO * BITMAPINFO;
GLubyte *BitmapBits;
char *nomimage;
float xRot=0;
float yRot=0;

void init(void)
{
bd=0;
bi=0;
//glClearColor (0.0, 0.0, 1.0, 0.0);
glClear( GL_COLOR_BUFFER_BIT GL_DEPTH_BUFFER_BIT);
//glEnable(GL_DEPTH_TEST);
glShadeModel (GL_SMOOTH);


}
void carcatex(){
BitmapBits = LoadDIBitmap(nomimage, &BitmapInfo);
glTexImage2D(GL_TEXTURE_2D,0,3,BitmapInfo->bmiHeader.biWidth,BitmapInfo->bmiHeader.biHeight,0,GL_RGB,GL_UNSIGNED_BYTE,BitmapBits);
glTexParameteri(GL_TEXTURE_2D, GL_TEXTURE_WRAP_S, GL_REPEAT);
glTexParameteri (GL_TEXTURE_2D, GL_TEXTURE_WRAP_T, GL_REPEAT)
glTexParameteri (GL_TEXTURE_2D, GL_TEXTURE_MAG_FILTER, GL_LINEAR)
glTexParameteri (GL_TEXTURE_2D, GL_TEXTURE_MIN_FILTER, GL_LINEAR)
/ / glTexEnvi (GL_TEXTURE_ENV, GL_TEXTURE_ENV_MODE, GL_BLEND)
glTexImage2D (GL_TEXTURE_2D, 0, 3 , 128,128,0, GL_RGB, GL_UNSIGNED_BYTE, BitmapBits);}

void cmaterial (x, y) {float
colorf [4] = {} 0.0,0.4,0,1;
float color [4] = {0.2, .4,1,1};
colord float [4] = {} 0.3,0,1,1;
float color [4] = {0.5, .0,0,1};
float colors [4] = {0.5, .6,0,1};
colorin float [4] = {0.0, .6,0,1};
glShadeModel (GL_SMOOTH)
glPushMatrix ();
glRotatef (45,0,1,1);
glTranslatef (x, y, 0);
/ * Faces cross * /
nomimage = "mountain.bmp" / Name the image
carcatex ();
glMaterialfv (GL_FRONT, GL_DIFFUSE, colord)
glEnable (GL_TEXTURE_2D);
glBegin (GL_QUADS)
/ * Vertical back * /
glTexCoord2f (0.0, 0.0);
glVertex3f (1, 0, 0);
glTexCoord2f (1.0, 0.0);
glVertex3f (0, 0, 0);
glTexCoord2f (1.0, 1.0);
glVertex3f (0, 1, 0);
glTexCoord2f (0.0, 1.0 )
glVertex3f (1, 1, 0);
glEnd ();
glMaterialfv (GL_FRONT, GL_SPECULAR, color);
nomimage = "mountain1.bmp"
carcatex ();
glEnable (GL_TEXTURE_2D);
glBegin (GL_QUADS)
/ * Superior, horizontal * /
glTexCoord2f (0.0, 0.0 )
glVertex3f (1, 1, 1);
glTexCoord2f (1.0, 0.0);
glVertex3f (0, 1, 1);
glTexCoord2f (1.0, 1.0);
glVertex3f (0, 1, 0);
glTexCoord2f (0.0, 1.0);
glVertex3f (1, 1, 0);
glEnd ();
glMaterialfv (GL_FRONT, GL_AMBIENT_AND_DIFFUSE, colorf)
nomimage = "mountain2.bmp"
carcatex ();
glEnable (GL_TEXTURE_2D) ;
glBegin (GL_QUADS )
/ * Vertical front * /
glTexCoord2f (0.0, 0.0);
glVertex3f (1, 0, 1);
glTexCoord2f (1.0, 0.0);
glVertex3f (1, 0, 0);
glTexCoord2f (1.0, 1.0);
glVertex3f (1 1, 0);
glTexCoord2f (0.0, 1.0);
glVertex3f (1, 1, 1);
glEnd ();
glMaterialfv (GL_FRONT, GL_EMISSION, colorin)
nomimage = " mountain3.bmp "
carcatex ();
glEnable (GL_TEXTURE_2D);
glBegin (GL_QUADS)
/ * Bottom * /
glTexCoord2f (0.0, 0.0);
glVertex3f (0, 0, 1);
glTexCoord2f (1.0 , 0.0);
glVertex3f (0, 0, 0);
glTexCoord2f (1.0, 1.0);
glVertex3f (0, 1, 0);
glTexCoord2f (0.0, 1.0);
glVertex3f (0, 1, 1);
glEnd ();
glMaterialfv (GL_FRONT, GL_AMBIENT_AND_DIFFUSE, color);
/ * Sides * /
nomimage = "mountain4.bmp"
carcatex ();
glEnable (GL_TEXTURE_2D);
glBegin (GL_QUADS)
glTexCoord2f (0.0, 0.0);
glVertex3f (1, 0, 1);
glTexCoord2f (1.0, 0.0);
glVertex3f (1, 0, 0);
glTexCoord2f (1.0, 1.0);
glVertex3f (0, 0, 0);
glTexCoord2f (0.0, 1.0);
glVertex3f (0, 0 , 1);
glEnd ();
glMaterialfv (GL_FRONT, GL_AMBIENT, colors);
nomimage = "aide.bmp" / / photo
carcatex ();
glEnable (GL_TEXTURE_2D);
glBegin (GL_QUADS)
glTexCoord2f (0.0f, 1.0f);
glVertex3f (1, 0 , 1);
glTexCoord2f (1.0f, 1.0f);
glVertex3f (1, 1, 1);
glTexCoord2f (1.0f, 0.0f);
glVertex3f (0, 1, 1);
glTexCoord2f (0.0f, 0.0f);
glVertex3f (0, 0, 1);
glEnd ();
glPopMatrix ();}

void cmaterial1 (x, y) {float
colorf [4] = {0.0,0.4,0,1 };
float color [4] = {0.2, .4,1,1};
colord float [4] = {} 0.3,0,1,1;
float color [4] = {0.5, .0, 0.1};
float colors [4] = {0.5, .6,0,1};
colorin float [4] = {0.0, .6,0,1};
glShadeModel (GL_SMOOTH)
glPushMatrix ();
glRotatef ( 45,0,1,1);
glTranslatef (x, y, 0);
/ * Faces cross * /
glBegin (GL_QUADS)
/ * Vertical back * /
glVertex3f (1, 0, 0);
glVertex3f (0, 0, 0);
glVertex3f (0, 1, 0);
glVertex3f (1, 1, 0);
glEnd ();

glMaterialfv (GL_FRONT, GL_SPECULAR, colori)
glBegin (GL_QUADS )
/ * Upper horizontal * /
glVertex3f (1, 1, 1);
glVertex3f (0, 1, 1);
glVertex3f (0, 1, 0);
glVertex3f (1, 1, 0);
glEnd ();
glMaterialfv (GL_FRONT, GL_AMBIENT_AND_DIFFUSE, colorf)
glBegin (GL_QUADS)
/ * Vertical front * / glVertex3f
(1, 0, 1);
glVertex3f (1, 0, 0);
glVertex3f (1, 1, 0);
glVertex3f (1, 1, 1);
glEnd ();
glMaterialfv (GL_FRONT, GL_EMISSION, colorin)
glBegin (GL_QUADS)
/ * Bottom * /
glVertex3f (0, 0, 1);
glVertex3f (0, 0, 0);
glVertex3f (0, 1, 0);
glVertex3f (0, 1, 1);
glEnd ();
glMaterialfv (GL_FRONT, GL_AMBIENT_AND_DIFFUSE, colora );
/* Costados */
glBegin( GL_QUADS );
glVertex3f( 1, 0, 1 );
glVertex3f( 1, 0, 0 );
glVertex3f( 0, 0, 0 );
glVertex3f( 0, 0, 1 );
glEnd();
glMaterialfv(GL_FRONT, GL_AMBIENT, colors );
glBegin( GL_QUADS );
glVertex3f( 1, 0, 1 );
glVertex3f( 1, 1, 1 );
glVertex3f( 0, 1, 1 );
glVertex3f( 0, 0, 1 );
glEnd();
glPopMatrix();
}
void display(void)
{
GLfloat light_ambient[]={0.0, 0.0, 0.0, 1.0};
GLfloat light_diffuse[]={1.0, 1.0, 1.0, 1.0};
GLfloat light_specular[]={1.0, 1.0, 1.0, 1.0};
GLfloat light_position[]={xRot, yRot, 1.0, 1.0};
GLfloat light1_ambient[]={0.0, 0.0, 0.0, 1.0};
GLfloat light1_diffuse[]={.5, .5, .5, .5};
GLfloat light1_specular[]={.1, .1, .1, .1};
GLfloat light1_position[]={1.0, 1.0, 10, 10.0};
glClear (GL_COLOR_BUFFER_BIT);
glColor3f (1.0, 1.0, 1.0);
glLoadIdentity (); /* clear the matrix */
gluLookAt (0.0, 0.0, 5.0, 0.0, 0.0, 0.0, 0.0, 1.0, 0.0);
glLightfv(GL_LIGHT0, GL_AMBIENT, light_ambient);
glLightfv(GL_LIGHT0, GL_DIFFUSE, light_diffuse);
glLightfv(GL_LIGHT0, GL_SPECULAR, light_specular);
glLightfv(GL_LIGHT0, GL_POSITION, light_position);
glLightfv(GL_LIGHT1, GL_AMBIENT, light1_ambient);
glLightfv(GL_LIGHT1, GL_DIFFUSE, light1_diffuse);
glLightfv(GL_LIGHT1, GL_SPECULAR, light1_specular);
glLightfv(GL_LIGHT1, GL_POSITION, light1_position);
glEnable(GL_LIGHT0);
glEnable(GL_LIGHT1);
glEnable( GL_LIGHTING );
if(bi==1){
glDisable( GL_LIGHT0 );
glEnable( GL_LIGHT1 );}
if(bi==2){
glEnable( GL_LIGHT0 );
glDisable( GL_LIGHT1 );}
cmaterial(-1,1);
cmaterial1(-1,-1);
glFlush ();
}
void reshape (int w, int h)
{
glViewport (0, 0, (GLsizei) w, (GLsizei) h);
glMatrixMode (GL_PROJECTION);
glLoadIdentity ();
glFrustum (-1.0, 1.0, -1.0, 1.0, 1.5, 20.0);
glMatrixMode (GL_MODELVIEW);
}
void onMouse(int button, int state, int x, int y)
{
int aux;
if ( (button == GLUT_LEFT_BUTTON) & (state == GLUT_DOWN) ) {
bi=1;
}
if ( (button == GLUT_RIGHT_BUTTON) & (state == GLUT_DOWN) ) {
bi=2;
}
display();
}
void keyboard(int key, int x, int y)
{
if(key == GLUT_KEY_UP)
xRot-= 0.2f;
if(key == GLUT_KEY_DOWN)
xRot += 0.2f;
if(key == GLUT_KEY_LEFT)
yRot -= 0.2f;
if(key == GLUT_KEY_RIGHT)
yRot += 0.2f;
if(key > 1.0f)
xRot = 0.0f;
if(key < 0.0f)
xRot = 1.0f;
if(key > 1.0f)
yRot = 0.0f;
if(key < 0.0f)
yRot = 1.0f;
// Refresh the Window
glutPostRedisplay();
}
int main(int argc, char** argv)
{
glutInit(&argc, argv);
glutInitDisplayMode (GLUT_SINGLE GLUT_RGB);
glutInitWindowSize (500, 500);
glutInitWindowPosition (300,230);
glutCreateWindow (argv [0]);
Init ();
glutDisplayFunc (display);
glutMouseFunc (onMouse);
glutReshapeFunc (reshape);
glutKeyboardFunc (Keyboard);
glutMainLoop ();
return 0;}


Bookstore Assistant to load texture LA BITMAP.C

# include "bitmap.h"
# include stdio.h # include stdlib.h # include errno.h


# ifdef Win32
GLubyte * / * O - Bitmap date * /
LoadDIBitmap (const char * filename, / * I - File to load * /
BITMAPINFO ** info) / * O - Bitmap information * /

{FILE * fp / * Open file pointer * / GLubyte *
bits; /* Bitmap pixel bits */
int bitsize; /* Size of bitmap */
int infosize; /* Size of header information */
BITMAPFILEHEADER header; /* File header */

/* Try opening the file; use "rb" mode to read this *binary* file. */
if ((fp = fopen(filename, "rb")) == NULL)
return (NULL);
/* Read the file header and any following bitmap information... */
if (fread(&header, sizeof(BITMAPFILEHEADER), 1, fp) < 1)
{
/* Couldn't read the file header - return NULL... */
fclose(fp);
return (NULL);
}
if (header.bfType != 'MB') /* Check for BM reversed... */
{
/* Not a bitmap file - return NULL... */
fclose(fp);
return (NULL);
}
infosize = header.bfOffBits - sizeof(BITMAPFILEHEADER);
if ((*info = (BITMAPINFO *)malloc(infosize)) == NULL)
{
/* Couldn't allocate memory for bitmap info - return NULL... */
fclose(fp);
return (NULL);
}
if (fread(*info, 1, infosize, fp) < infosize)
{
/* Couldn't read the bitmap header - return NULL... */
free(*info);
fclose(fp);
return (NULL);
}
/* Now that we have all the header info read in, allocate memory for *
* the bitmap and read *it* in... */
if ((bitsize = (*info)->bmiHeader.biSizeImage) == 0)
bitsize = ((*info)->bmiHeader.biWidth *
(*info)->bmiHeader.biBitCount + 7) / 8 *
abs((*info)->bmiHeader.biHeight);
if ((bits = malloc(bitsize)) == NULL)
{
/* Couldn't allocate memory - return NULL! */
free(*info);
fclose(fp);
return (NULL);
}
if (fread(bits, 1, bitsize, fp) < bitsize)
{
/* Couldn't read bitmap - free memory and return NULL! */
free(*info);
free(bits);
fclose(fp);
return (NULL);
}
/* OK, everything went fine - return the allocated bitmap... */
fclose(fp);
return (bits);
}

/*
* 'SaveDIBitmap()' - Save a DIB/BMP file to disk.
*
* Returns 0 on success or -1 on failure...
*/
int /* O - 0 = success, -1 = failure */
SaveDIBitmap(const char *filename, /* I - File to load */
BITMAPINFO *info, /* I - Bitmap information */
GLubyte *bits) /* I - Bitmap data */
{
FILE *fp; /* Open file pointer */
int size, /* Size of file */
infosize, /* Size of bitmap info */
bitsize; /* Size of bitmap pixels */
BITMAPFILEHEADER header; /* File header */

/* Try opening the file; use "wb" mode to write this *binary* file. */
if ((fp = fopen(filename, "wb")) == NULL)
return (-1);
/* Figure out the bitmap size */
if (info->bmiHeader.biSizeImage == 0)
bitsize = (info->bmiHeader.biWidth *
info->bmiHeader.biBitCount + 7) / 8 *
abs(info->bmiHeader.biHeight);
else
bitsize = info->bmiHeader.biSizeImage;
/* Figure out the header size */
infosize = sizeof(BITMAPINFOHEADER);
switch (info->bmiHeader.biCompression)
{
case BI_BITFIELDS :
infosize += 12; /* Add 3 RGB doubleword masks */
if (info->bmiHeader.biClrUsed == 0)
break;
case BI_RGB :
if (info->bmiHeader.biBitCount > 8 &&amp;
info->bmiHeader.biClrUsed == 0)
break;
case BI_RLE8 :
case BI_RLE4 :
if (info->bmiHeader.biClrUsed == 0)
infosize += (1 <<> bmiHeader.biBitCount) * 4;
else
infosize += info->bmiHeader.biClrUsed * 4;
break;
}
size = sizeof(BITMAPFILEHEADER) + infosize + bitsize;
/* Write the file header, bitmap information, and bitmap pixel data... */
header.bfType = 'MB'; /* Non-portable... sigh */
header.bfSize = size;
header.bfReserved1 = 0;
header.bfReserved2 = 0;
header.bfOffBits = sizeof(BITMAPFILEHEADER) + infosize;
if (fwrite(&header, 1, sizeof(BITMAPFILEHEADER), fp) < sizeof(BITMAPFILEHEADER))
{
/* Couldn't write the file header - return... */
fclose(fp);
return (-1);
}
if (fwrite(info, 1, infosize, fp) < infosize)
{
/* Couldn't write the bitmap header - return... */
fclose(fp);
return (-1);
}
if (fwrite(bits, 1, bitsize, fp) < bitsize)
{
/* Couldn't write the bitmap - return... */
fclose(fp);
return (-1);
}
/* OK, everything went fine - return... */
fclose(fp);
return (0);
}

#else /* !WIN32 */
/*
* Functions for reading and writing 16- and 32-bit little-endian integers.
*/
static unsigned short read_word(FILE *fp);
static unsigned int read_dword(FILE *fp);
static int read_long(FILE *fp);
static int write_word(FILE *fp, unsigned short w);
static int write_dword(FILE *fp, unsigned int dw);
static int write_long(FILE *fp, int l);

/*
* 'LoadDIBitmap()' - Load a DIB/BMP file from disk.
*
* Returns a pointer to the bitmap if successful, NULL otherwise...
*/
GLubyte * /* O - Bitmap data */
LoadDIBitmap(const char *filename, /* I - File to load */
BITMAPINFO **info) /* O - Bitmap information */
{
FILE *fp; /* Open file pointer */
GLubyte *bits; /* Bitmap pixel bits */
GLubyte *ptr; /* Pointer into bitmap */
GLubyte temp; /* Temporary variable to swap red and blue */
int x, y; /* X and Y position in image */
int length; /* Line length */
int bitsize; /* Size of bitmap */
int infosize; /* Size of header information */
BITMAPFILEHEADER header; /* File header */

/* Try opening the file; use "rb" mode to read this *binary* file. */
if ((fp = fopen(filename, "rb")) == NULL)
return (NULL);
/* Read the file header and any following bitmap information... */
header.bfType = read_word(fp);
header.bfSize = read_dword(fp);
header.bfReserved1 = read_word(fp);
header.bfReserved2 = read_word(fp);
header.bfOffBits = read_dword(fp);
if (header.bfType != BF_TYPE) /* Check for BM reversed... */
{
/* Not a bitmap file - return NULL... */
fclose(fp);
return (NULL);
}
infosize = header.bfOffBits - 18;
if ((*info = (BITMAPINFO *)malloc(sizeof(BITMAPINFO))) == NULL)
{
/* Couldn't allocate memory for bitmap info - return NULL... */
fclose(fp);
return (NULL);
}
(*info)->bmiHeader.biSize = read_dword(fp);
(*info)->bmiHeader.biWidth = read_long(fp);
(*info)->bmiHeader.biHeight = read_long(fp);
(*info)->bmiHeader.biPlanes = read_word(fp);
(*info)->bmiHeader.biBitCount = read_word(fp);
(*info)->bmiHeader.biCompression = read_dword(fp);
(*info)->bmiHeader.biSizeImage = read_dword(fp);
(*info)->bmiHeader.biXPelsPerMeter = read_long(fp);
(*info)->bmiHeader.biYPelsPerMeter = read_long(fp);
(*info)->bmiHeader.biClrUsed = read_dword(fp);
(*info)->bmiHeader.biClrImportant = read_dword(fp);
if (infosize > 40)
if (fread((*info)->bmiColors, infosize - 40, 1, fp) < 1)
{
/* Couldn't read the bitmap header - return NULL... */
free(*info);
fclose(fp);
return (NULL);
}
/* Now that we have all the header info read in, allocate memory for *
* the bitmap and read *it* in... */
if ((bitsize = (*info)->bmiHeader.biSizeImage) == 0)
bitsize = ((*info)->bmiHeader.biWidth *
(*info)->bmiHeader.biBitCount + 7) / 8 *
abs((*info)->bmiHeader.biHeight);
if ((bits = malloc(bitsize)) == NULL)
{
/* Couldn't allocate memory - return NULL! */
free(*info);
fclose(fp);
return (NULL);
}
if (fread(bits, 1, bitsize, fp) < bitsize)
{
/* Couldn't read bitmap - free memory and return NULL! */
free(*info);
free(bits);
fclose(fp);
return (NULL);
}
/* Swap red and blue */
length = ((*info)->bmiHeader.biWidth * 3 + 3) & ~3;
for (y = 0; y < (*info)-> bmiHeader.biHeight; y ++)
for (ptr = bits + y * length, x = (*info)->bmiHeader.biWidth;
x > 0;
x --, ptr += 3)
{
temp = ptr[0];
ptr[0] = ptr[2];
ptr[2] = temp;
}
/* OK, everything went fine - return the allocated bitmap... */
fclose(fp);
return (bits);
}

/*
* 'SaveDIBitmap()' - Save a DIB/BMP file to disk.
*
* Returns 0 on success or -1 on failure...
*/
int /* O - 0 = success, -1 = failure */
SaveDIBitmap(const char *filename, /* I - File to load */
BITMAPINFO *info, /* I - Bitmap information */
GLubyte *bits) /* I - Bitmap data */
{
FILE *fp; /* Open file pointer */
int size, /* Size of file */
infosize, /* Size of bitmap info */
bitsize; /* Size of bitmap pixels */

/* Try opening the file; use "wb" mode to write this *binary* file. */
if ((fp = fopen(filename, "wb")) == NULL)
return (-1);
/* Figure out the bitmap size */
if (info->bmiHeader.biSizeImage == 0)
bitsize = (info->bmiHeader.biWidth *
info->bmiHeader.biBitCount + 7) / 8 *
abs(info->bmiHeader.biHeight);
else
bitsize = info->bmiHeader.biSizeImage;
/* Figure out the header size */
infosize = sizeof(BITMAPINFOHEADER);
switch (info->bmiHeader.biCompression)
{
case BI_BITFIELDS :
infosize += 12; /* Add 3 RGB doubleword masks */
if (info->bmiHeader.biClrUsed == 0)
break;
case BI_RGB :
if (info->bmiHeader.biBitCount > 8 &&amp;
info->bmiHeader.biClrUsed == 0)
break;
case BI_RLE8 :
case BI_RLE4 :
if (info->bmiHeader.biClrUsed == 0)
infosize += (1 <<> bmiHeader.biBitCount) * 4;
else
infosize += info->bmiHeader.biClrUsed * 4;
break;
}
size = sizeof(BITMAPFILEHEADER) + infosize + bitsize;
/* Write the file header, bitmap information, and bitmap pixel data... */
write_word(fp, BF_TYPE); /* bfType */
write_dword(fp, size); /* bfSize */
write_word(fp, 0); /* bfReserved1 */
write_word(fp, 0); /* bfReserved2 */
write_dword(fp, 18 + infosize); /* bfOffBits */
write_dword(fp, info->bmiHeader.biSize);
write_long (fp, info-> bmiHeader.biWidth);
write_long (fp, info-> bmiHeader.biHeight);
write_word (fp, info-> bmiHeader.biPlanes);
write_word (fp, info-> bmiHeader.biBitCount );
write_dword (fp, info-> bmiHeader.biCompression);
write_dword (fp, info-> bmiHeader.biSizeImage);
write_long (fp, info-> bmiHeader.biXPelsPerMeter);
write_long (fp, info-> bmiHeader . biYPelsPerMeter);
write_dword (fp, info-> bmiHeader.biClrUsed);
write_dword (fp, info-> bmiHeader.biClrImportant);
if (info-size> 40)
if (fwrite (info-> bmiColors, info-size - 40 , 1, fp) < 1)
{
/* Couldn't write the bitmap header - return... */
fclose(fp);
return (-1);
}
if (fwrite(bits, 1, bitsize, fp) < bitsize)
{
/* Couldn't write the bitmap - return... */
fclose(fp);
return (-1);
}
/* OK, everything went fine - return... */
fclose(fp);
return (0);
}

/*
* 'read_word()' - Read a 16-bit unsigned integer.
*/
static unsigned short /* O - 16-bit unsigned integer */
read_word(FILE *fp) /* I - File to read from */
{
unsigned char b0, b1; /* Bytes from file */
b0 = getc(fp);
b1 = getc(fp);
return ((b1 << 8) b0);
}

/*
* 'read_dword()' - Read a 32-bit unsigned integer.
*/
static unsigned int /* O - 32-bit unsigned integer */
read_dword(FILE *fp) /* I - File to read from */
{
unsigned char b0, b1, b2, b3; /* Bytes from file */
b0 = getc(fp);
b1 = getc(fp);
b2 = getc(fp);
b3 = getc(fp);
return ((((((b3 << 8) b2) << 8) b1) << 8) b0);
}

/*
* 'read_long()' - Read a 32-bit signed integer.
*/
static int /* O - 32-bit signed integer */
read_long(FILE *fp) /* I - File to read from */
{
unsigned char b0, b1, b2, b3; /* Bytes from file */
b0 = getc(fp);
b1 = getc(fp);
b2 = getc(fp);
b3 = getc(fp);
return ((int)(((((b3 << 8) b2) << 8) b1) << 8) b0);
}

/*
* 'write_word()' - Write a 16-bit unsigned integer.
*/
static int /* O - 0 on success, -1 on error */
write_word(FILE *fp, /* I - File to write to */
unsigned short w) /* I - Integer to write */
{
putc(w, fp);
return (putc(w >> 8, fp));
}

/*
* 'write_dword()' - Write a 32-bit unsigned integer.
*/
static int /* O - 0 on success, -1 on error */
write_dword(FILE *fp, /* I - File to write to */
unsigned int dw) /* I - Integer to write */
{
putc(dw, fp);
putc(dw >> 8, fp);
putc(dw >> 16, fp);
return (putc(dw >> 24, fp));
}

/*
* 'write_long()' - Write a 32-bit signed integer.
*/
static int /* O - 0 on success, -1 on error */
write_long(FILE *fp, /* I - File to write to */
int l) /* I - Integer to write */
{
putc(l, fp);
putc(l >> 8, fp);
putc(l >> 16, fp);
return (putc(l >> 24, fp));
}
#endif /* WIN32 */

LIBRERIA AUXILIAR BITMAP.H
#ifndef _BITMAP_H_
# define _BITMAP_H_
/*
* Include necessary headers.
*/
# include
# ifdef WIN32
# include
# include
# endif /* WIN32 */
/*
* Make this header file work with C and C++ source code...
*/
# ifdef __cplusplus
extern "C" {
# endif /* __cplusplus */

/*
* Bitmap file data structures (these are defined in under
* Windows...)
*
* Note that most Windows compilers will pack the following structures, so
* when reading them under MacOS or UNIX we need to read individual fields
* to avoid differences in alignment...
*/
# ifndef WIN32
typedef struct /**** BMP file header structure ****/
{
unsigned short bfType; /* Magic number for file */
unsigned int bfSize; /* Size of file */
unsigned short bfReserved1; /* Reserved */
unsigned short bfReserved2; /* ... */
unsigned int bfOffBits; /* Offset to bitmap data */
} BITMAPFILEHEADER;
# define BF_TYPE 0x4D42 /* "MB" */
typedef struct /**** BMP file info structure ****/
{
unsigned int biSize; /* Size of info header */
int biWidth; /* Width of image */
int biHeight; /* Height of image */
unsigned short biPlanes; /* Number of color planes */
unsigned short biBitCount; /* Number of bits per pixel */
unsigned int biCompression; /* Type of compression to use */
unsigned int biSizeImage; /* Size of image data */
int biXPelsPerMeter; /* X pixels per meter */
int biYPelsPerMeter; /* Y pixels per meter */
unsigned int biClrUsed; /* Number of colors used */
unsigned int biClrImportant; /* Number of important colors */
} BITMAPINFOHEADER;
/*
* Constants for the biCompression field...
*/
# define BI_RGB 0 /* No compression - straight BGR data */
# define BI_RLE8 1 /* 8-bit run-length compression */
# define BI_RLE4 2 /* 4-bit run-length compression */
# define BI_BITFIELDS 3 /* RGB bitmap with RGB masks */
typedef struct /**** Colormap entry structure ****/
{
unsigned char rgbBlue; /* Blue value */
unsigned char rgbGreen; /* Green value */
unsigned char rgbRed; /* Red value */
unsigned char rgbReserved; /* Reserved */
} RGBQUAD;
typedef struct Bitmap information structure ****/ /****
{BITMAPINFOHEADER bmiHeader
/ * Image header * /
RGBQUAD bmiColors [256] / * Image colormap * /}
BITMAPINFO;
# endif / *! WIN32 * /
/ * * Prototypes
...
* / extern GLubyte * LoadDIBitmap
(const char * filename, BITMAPINFO ** info);
SaveDIBitmap extern int (const char * filename, BITMAPINFO * info,
GLubyte * bits);

# ifdef __cplusplus} # endif
/ * __cplusplus * /
# endif / *! _BITMAP_H_ * /

Note: To observe the texture is necessary to take pictures

Wednesday, May 2, 2007

Compatable Batavus Moped Parts

Lighting Components Prior Specular